Mobilny joystick wejściowy dotykowy w Unity
Aby stworzyć sterowaną postać w grze mobilnej, należy dodać przyciski wizualnie reprezentowane na ekranie i reagujące na wprowadzanie dotykowe.
W tym samouczku pokażę, jak utworzyć przycisk przypominający joystick w Unity, który nadaje się przede wszystkim do sterowania ruchem na telefonach z ekranem dotykowym.

Możesz także skorzystać z poniższego przykładu, aby dodać więcej przycisków i joysticków. Więc zaczynajmy!
Krok 1: Utwórz wszystkie niezbędne skrypty
- Utwórz dwa skrypty C#, korzystając z poniższego kodu źródłowego
MobileJoystick_UI.cs
using UnityEngine;
using UnityEngine.UI;

public class MobileJoystick_UI : MonoBehaviour
{

    //Mobile controller graphics
    public Sprite navigationCircle;
    public Sprite navigationButton;
    //Use this in your movement script for the input control
    public Vector2 moveDirection;
    //Joystick components size
    int circleSize = 120;
    int buttonSize = 100;
    //How far the joystick should be placed from the side of the screen
    int marginLeft = 100;
    //How far the joystick should be placed from the bottom of the screen
    int marginBottom = 100;

    Canvas mainCanvas;

    //Mobile movement
    [System.Serializable]
    public class JoystickButton
    {
        public Image backgroundCircle;
        public Image mainButton;
        public Rect defaultArea;
        public Vector2 touchOffset;
        public Vector2 currentTouchPos;
        public int touchID;
        public bool isActive = false;
    }

    //Move joystick data
    JoystickButton moveTouch = new JoystickButton();

    public static MobileJoystick_UI instance;

    // Start is called before the first frame update
    void Start()
    {
        if (instance != null)
        {
            //There is another instance already present, remove this one
            Destroy(gameObject);
            return;
        }
        //Assign this instance to a static variable so you can access the movement direction directly at MobileJoystick_UI.instance.moveDirection
        instance = this;

        //This function will initialize canvas element along with the joystick button
        GameObject tmpObj = new GameObject("Canvas");
        tmpObj.transform.position = Vector3.zero;
        mainCanvas = tmpObj.AddComponent<Canvas>();
        mainCanvas.renderMode = RenderMode.ScreenSpaceOverlay;
        mainCanvas.pixelPerfect = true;

        //Add Canvas Scaler component
        CanvasScaler canvasScaled = tmpObj.AddComponent<CanvasScaler>();
        canvasScaled.scaleFactor = 1;
        canvasScaled.referencePixelsPerUnit = 100;

        //Add Graphic Raycaster element
        tmpObj.AddComponent<GraphicRaycaster>();

        //Setup navigation background
        GameObject cntrlTmpObj = new GameObject("Movement Circle");
        cntrlTmpObj.transform.position = Vector3.zero;
        cntrlTmpObj.transform.parent = tmpObj.transform;
        moveTouch.backgroundCircle = cntrlTmpObj.AddComponent<Image>();
        moveTouch.backgroundCircle.sprite = navigationCircle;
        moveTouch.backgroundCircle.rectTransform.anchorMin = new Vector2(0, 0);
        moveTouch.backgroundCircle.rectTransform.anchorMax = new Vector2(0, 0);
        moveTouch.backgroundCircle.rectTransform.sizeDelta = new Vector2(circleSize, circleSize);
        moveTouch.backgroundCircle.rectTransform.pivot = new Vector2(0, 0);
        moveTouch.backgroundCircle.rectTransform.position = new Vector3(marginLeft, marginBottom, 0);

        //Navigation button
        cntrlTmpObj = new GameObject("Movement Button");
        cntrlTmpObj.transform.position = Vector3.zero;
        cntrlTmpObj.transform.parent = tmpObj.transform;
        moveTouch.mainButton = cntrlTmpObj.AddComponent<Image>();
        moveTouch.mainButton.sprite = navigationButton;
        moveTouch.mainButton.rectTransform.anchorMin = new Vector2(0, 0);
        moveTouch.mainButton.rectTransform.anchorMax = new Vector2(0, 0);
        moveTouch.mainButton.rectTransform.sizeDelta = new Vector2(buttonSize, buttonSize);
        moveTouch.mainButton.rectTransform.pivot = new Vector2(0, 0);
        moveTouch.mainButton.rectTransform.position = new Vector3(marginLeft + (circleSize - buttonSize) / 2, marginBottom + (circleSize - buttonSize) / 2, 0);

        //Save the default location of the joystick button to be used later for input detection
        moveTouch.defaultArea = new Rect(moveTouch.mainButton.rectTransform.position.x,
            moveTouch.mainButton.rectTransform.position.y,
            moveTouch.mainButton.rectTransform.sizeDelta.x,
            moveTouch.mainButton.rectTransform.sizeDelta.y);
    }

    // Update is called once per frame
    void Update()
    {
        //Handle joystick movement
#if (UNITY_ANDROID || UNITY_IOS || UNITY_WP8 || UNITY_WP8_1) && !UNITY_EDITOR
        //Mobile touch input
        for (var i = 0; i < Input.touchCount; ++i)
        {
            Touch touch = Input.GetTouch(i);

            if (touch.phase == TouchPhase.Began)
            {
                MobileButtonsCheck(new Vector2(touch.position.x, Screen.height - touch.position.y), touch.fingerId);
            }

            if (touch.phase == TouchPhase.Moved )
            {
                if(moveTouch.isActive && moveTouch.touchID == touch.fingerId)
                {
                    moveTouch.currentTouchPos = touch.position;
                }
            }

            if (touch.phase == TouchPhase.Ended || touch.phase == TouchPhase.Canceled)
            {
                MobileButtonStop(touch.fingerId);
            }
        }
#else
        //Desktop mouse input for editor testing
        if (Input.GetMouseButtonDown(0))
        {
            MobileButtonsCheck(new Vector2(Input.mousePosition.x, Screen.height - Input.mousePosition.y), -1);
        }

        if (Input.GetMouseButtonUp(0))
        {
            MobileButtonStop(-1);
        }

        moveTouch.currentTouchPos = Input.mousePosition;
#endif

        //Moving
        if (moveTouch.isActive)
        {
            moveTouch.mainButton.rectTransform.position = new Vector3(moveTouch.currentTouchPos.x - moveTouch.touchOffset.x, moveTouch.currentTouchPos.y - moveTouch.touchOffset.y);
            moveDirection.x = moveTouch.mainButton.rectTransform.position.x - moveTouch.defaultArea.x;
            moveDirection.y = moveTouch.mainButton.rectTransform.position.y - moveTouch.defaultArea.y;

            if (Mathf.Abs(moveDirection.x) < 19)
            {
                moveDirection.x = 0;
            }
            else
            {
                moveDirection.x = Mathf.Clamp(moveDirection.x / 75.000f, -1.000f, 1.000f);
            }

            if (Mathf.Abs(moveDirection.y) < 19)
            {
                moveDirection.y = 0;
            }
            else
            {
                moveDirection.y = Mathf.Clamp(moveDirection.y / 75.000f, -1.000f, 1.000f);
            }
        }
        else
        {
            moveTouch.mainButton.rectTransform.position = new Vector3(moveTouch.defaultArea.x, moveTouch.defaultArea.y);
            moveDirection = Vector2.zero;
        }
    }

    //Here we check if the clicked/tapped position is inside the joystick button
    void MobileButtonsCheck(Vector2 touchPos, int touchID)
    {
        //Move controller
        if (moveTouch.defaultArea.Contains(new Vector2(touchPos.x, Screen.height - touchPos.y)) && !moveTouch.isActive)
        {
            moveTouch.isActive = true;
            moveTouch.touchOffset = new Vector2(touchPos.x - moveTouch.defaultArea.x, Screen.height - touchPos.y - moveTouch.defaultArea.y);
            moveTouch.currentTouchPos = new Vector2(touchPos.x, Screen.height - touchPos.y);
            moveTouch.touchID = touchID;
        }
    }

    //Here we release the previously active joystick if we release the mouse button/finger from the screen
    void MobileButtonStop(int touchID)
    {
        if (moveTouch.isActive && moveTouch.touchID == touchID)
        {
            moveTouch.isActive = false;
            moveTouch.touchOffset = Vector2.zero;
            moveTouch.touchID = -1;
        }
    }
}
TouchPlayerController.cs
using UnityEngine;

public class TouchPlayerController : MonoBehaviour
{

    // Update is called once per frame
    void Update()
    {
        //Move Front/Back
        if (MobileJoystick_UI.instance.moveDirection.y != 0)
        {
            transform.Translate(transform.forward * Time.deltaTime * 2.45f * MobileJoystick_UI.instance.moveDirection.y, Space.World);
        }

        //Rotate Left/Right
        if (MobileJoystick_UI.instance.moveDirection.x != 0)
        {
            transform.Rotate(new Vector3(0, 14, 0) * Time.deltaTime * 4.5f * MobileJoystick_UI.instance.moveDirection.x, Space.Self);
        }
    }
}
Krok 2: Skonfiguruj prostą scenę, korzystając z powyższych skryptów
- Utwórz nową scenę
- Utwórz nowy obiekt GameObject i wywołaj go '_TouchInput'
- Dołącz do niego skrypt MobileJoystick_UI
- Przypisz zmienne 'Navigation Circle' i 'Navigation button'.
Możesz użyć ikonek poniżej lub kliknij tutaj:


- Po zaimportowaniu ich do Unity pamiętaj o zmianie typu tekstury na 'Sprite (2D and UI)'

Krok 3: Skonfiguruj instancję gracza
Na koniec konfigurujemy instancję gracza (w moim przypadku będzie to prosty obiekt GameObject z cylindrem w środku):
- Utwórz nowy GameObject i wywołaj go 'MobilePlayer'
- Dołącz skrypt TouchPlayerController do niego
- Utwórz nowy cylinder i zmniejsz jego wysokość, aż będzie wyglądał prawie płasko (w moim przypadku skala to (x: 1 y: 0,0142 z: 1) )
- Przesuń cylinder do obiektu 'MobilePlayer' GameObject
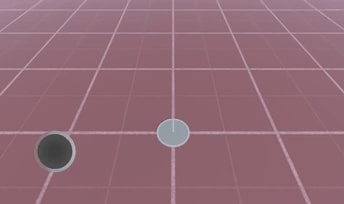
- Do celów testowych możesz także przenieść kamerę główną do 'MobilePlayer' i obrócić ją tak, aby była skierowana na gracza w następujący sposób:

Teraz nadszedł czas, aby nacisnąć Play i sprawdzić, czy wszystko działa. OK.

Wszystko działa zgodnie z oczekiwaniami! Sterowanie odtwarzaczem odbywa się poprzez poruszanie przyciskiem joysticka.
Skrypt MobileJoystick_UI obsługuje zarówno wprowadzanie dotykowe, jak i kliknięcie myszą (jeśli grasz w edytorze).